
Create and Run Computational Pipelines in UGENE
Here we discuss the hottest topics introduced by our users and show the helpful ways of using UGENE, a free cross-platform genome analysis suite.
Creating the Pipeline
In UGENE you can create and run complex computational workflows, with better utilization of available computing resources and with intuitive drag-n-drop interface. For example, we will perform exporting hundred of sequences from PDB (protein data bank) files into new FASTA files (convert to FASTA format pipeline).
For this purpose we will use UGENE Workflow Designer – a bioinformatics workflow management software. To open the workflow management software we activate Tools, Workflow Designer. At the left side two tabs are available: Samples and Objects. Samples contain different default schemes, but we will develop our own schema. Thus we press Objects tab to get access to the objects available to be added to the schema. The objects are processes (routines), which have input and/or output ports, used by objects to transfer data.
Reading PDB and Writing FASTA
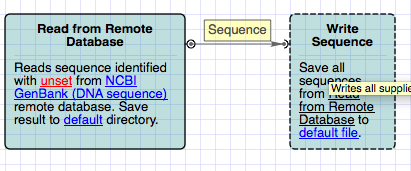
First of all, we need to read sequences from Protein Data Bank files. For this purpose we drag the Sequence reader object to the schema. Select the appeared “Sequence reader 1” object with mouse. The detailed description of the object has appeared in the Property Editor, which is placed at the top right. The circle to the right of “Sequence reader 1” is an output port. The object description says that it reads all sequences from unset location. Let's set the location. We can do it in the Parameters panel from the bottom right. We click on location value, then on appeared browse button and finally specify desired PDBs. Click OK.
Workflow designer asks us if want to divide the list of PDB files into separate iterations. Iterations are used to customize settings for every element. We answer No since we would like to process all the elements uniformly.
Now we need to write all the outcoming sequences into files. So, we drag “Write FASTA” object to the schema. The arc to the left of the object is input port. Click on the writer. We see that it writes all supplied sequences to file(s) in FASTA format. Awesome. We also need to specify the location of outgoing files. Click on Location value (the writer is currently selected), click Browse button and specify the output file name. Finally we connect our two objects by dragging the output port to the input port. Thus we have created a dataflow between these two objects which processes Sequences (as mentioned on top of dataflow arrow).
Running the Pipeline
We are ready to run the schema. To do this we press “Run schema” button. The work is done and we have a new report. Oops, we've got a warning too. The warning means that we didn't specify additional data which must be used as Fasta Header. It's OK, since these headers were generated automatically. And, we still have a new report. It says that the schema execution is finished. Let's open the output location. It has one file, accumulating all the sequences. We can load it.