
UGENE Mini-Tutorials: Export Workflow, Run Workflow and more
Translate DNA, Export a workflow, run a workflow in the command line
1. How-to in UGENE: How to translate DNA sequences into amino acid sequences?
If you want to translate DNA sequences into amino acid sequence, you can use the pre-defined workflow sample of UGENE Workflow Designer:
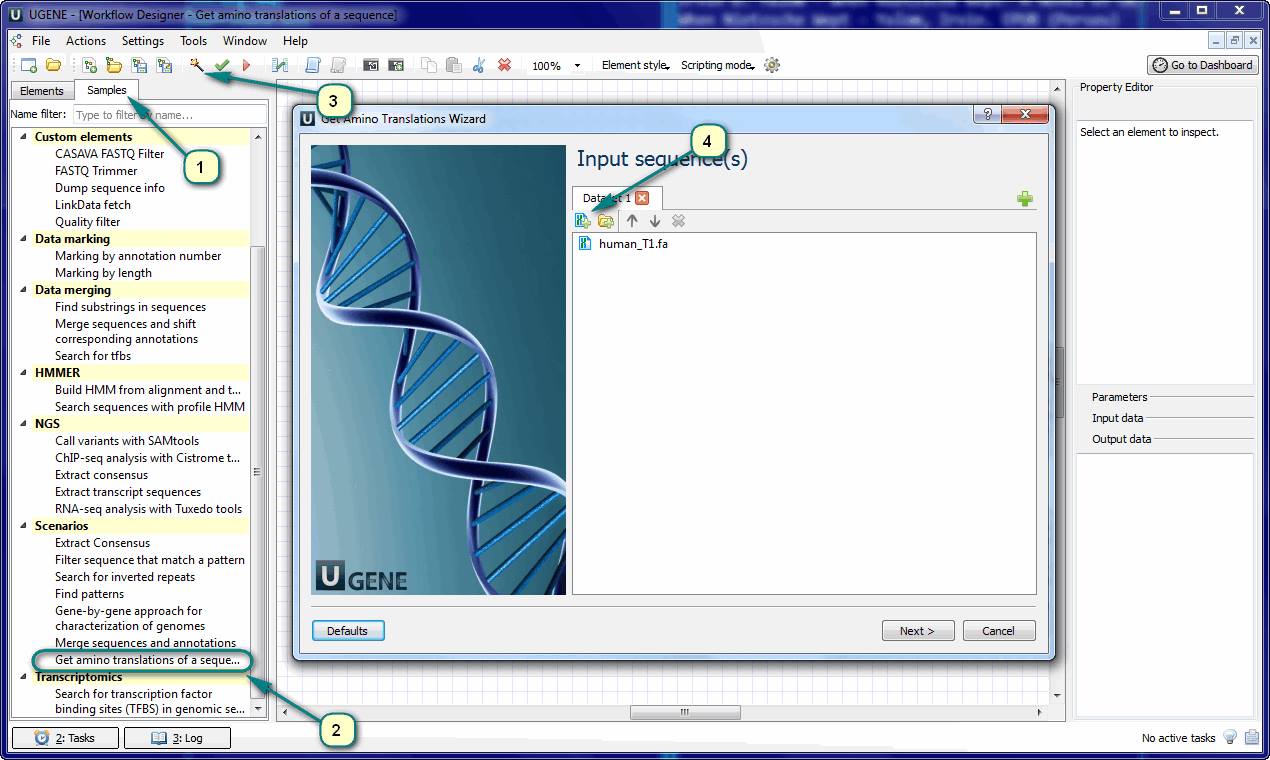
1. Open UGENE Workflow Designer (the menu Tools -> Workflow Designer).
2. Open the “Samples” tab and find the “Get amino translations of a sequence” in the “Scenarios” chapter. Double click to load the sample.
3. The opened workflow is almost ready to use. You just need to supply the input data. The input data are the file(s) with the DNA sequence(s). Click the magic wand button on the toolbar to activate the wizard – the fast and easy way of workflows adjusting.
4. Add input files and choose other settings (or use the default values) when you go through the wizard’s pages. Finally click the “Run” button in the last page.
There will be two result files: a file with three forward amino translations and a file with three reverse complement ones.
Find the UGENE Workflow Designer documentation here.
Export a workflow to your publication
If you have created a workflow with UGENE Workflow Designer you can save the picture of this workflow in a file. You could use this picture as a supplementary illustration of your article or put it into the presentation for your speech.
For exporting the picture use the menu item {Actions -> Export workflow as image} or the key combination Ctrl + Shift + S.
You can adjust the workflow’s look-and-feel:
1. Drag-and-drop the workflow elements on the scene with your mouse.
2. Move the elements’ ports. Use drag-and-drop with the pressed Alt keyboard-button for that.
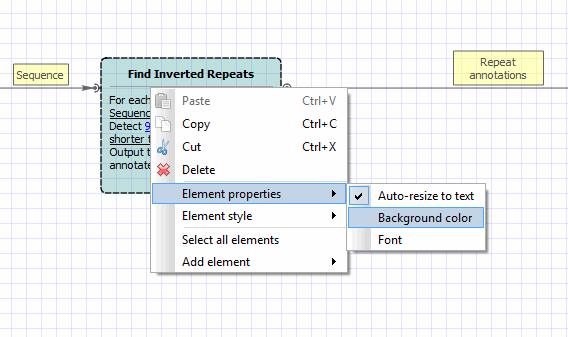
3. Change the elements’ color. If you want to change the color of an element, select the element, click the right mouse button and choose the item {Element properties -> Background color}.
The UGENE workflows are self-documenting. You can look through the workflow picture, read the elements descriptions and easily understand what the workflow does for its result.
You can even change the description of an element. For example, the “Find repeats” element name could be changed into “Tandem repeats finder”. Such qualifications could make a workflow more readable and understandable for your colleagues when you make your speech for them, for a tandem repeats finder in that case.
Run a workflow using the command line interface
Any UGENE workflow can be “transformed” into a separate command line application. For running a saved workflow with the command line use the key –task=/path/to/workflow:
./ugene –task=/home/user/my_workflow.uwl
UGENE provides a way of specifying parameters for the running workflow (input/output files, algorithm settings, etc). Let’s consider the example:
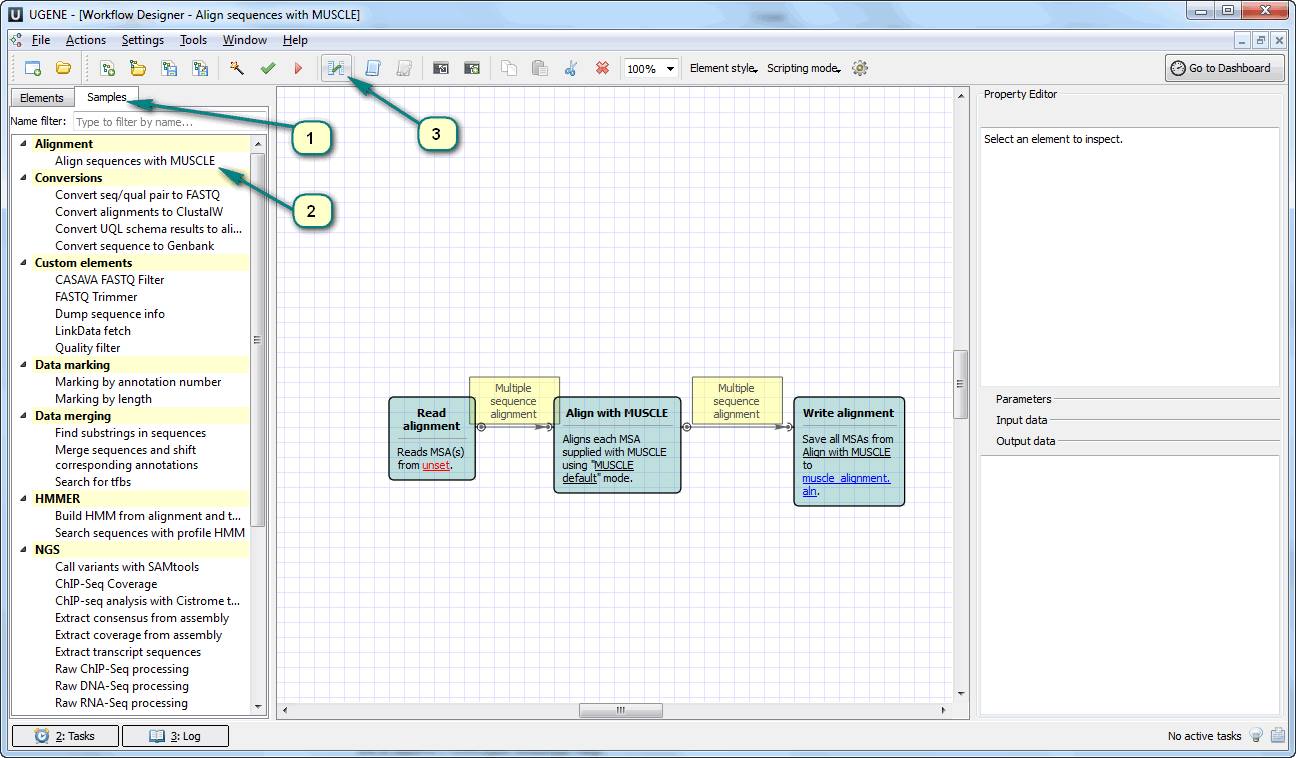
1. Open UGENE Workflow Designer, choose the “Samples” tab and double click the first sample “Align sequences with MUSCLE”. The sample does what it says – it performs muscle sequence alignment.
2. Click the menu {Actions -> Configure parameter aliases} or the corresponding toolbar button.
3. You can switch between the workflow elements in the left part of the appeared dialog and set the command line keys (aliases) in the right one. Let’s set aliases for the following parameters (the column “Parameter alias”):
a. The alias of the parameter “Input file(s)” of “Read Alignment” will be “in”.
b. “Output file” of “Write Alignment” – out.
c. “Max iterations” of the muscle sequence alignment element – max-iter.
4. Click OK and save the workflow to a file “my_workflow.uwl” (e.g. “C:/my_workflow.uwl”).
5. Now the workflow is ready to use with the command line interface:
ugene.exe –task=C:/my_workflow.uwl –in=input.aln –out=output.aln –max-iter=2
Thus, you would have “a separate command line application” that solves your task.
If you forget what command line keys you set for parameters, you can find it with the –help key:
ugene.exe –help=C:/my_workflow.uwl
If you fill in the column “Help message” (not only the “Parameter alias” column), those help messages will appear in the –help output.